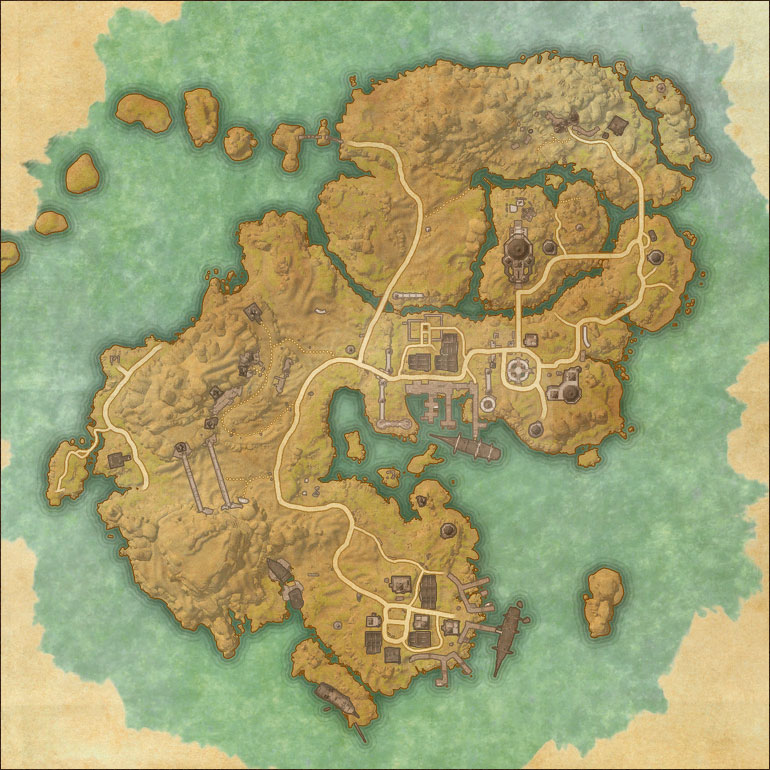
The Elder Scrolls Online, Map of Stros M'Kai
Stros M'Kai
Pirates and smugglers find safe haven on Stros M'Kai, which is ruled by the self-appointed Headman Bhosek the Bloody. Stros M'Kai is renowned for its completely steam-powered Dwemer ruins and ancient mines.
| Name | Description | Points | Category | |
|---|---|---|---|---|
 |
Stros M'Kai Angler | Catch a rare Eltheric Grouper in Stros M'Kai. | 5 | Trophies: Fishing |
 |
Stros M'Kai and Betnikh Explorer | Discover all of the striking locales on Stros M'Kai and Betnikh. | 15 | Exploration: Daggerfall Covenant |
 |
Stros M'Kai Pathfinder | Discover all of the striking locales on Stros M'Kai. | 5 | Exploration: Daggerfall Covenant |
 |
Stros M'Kai Skyshard Hunter | Find all 3 Skyshards in Stros M'Kai. | 5 | Skyshards |
 |
Famed Recruiter | Recruit all three famous privateers on Stros M'Kai. | 10 | Quests: Daggerfall Covenant |
Daggerfall Covenant Quests:
Quest Giver: Mihayya in Daggerfall
- Speak with Mihayya in Daggerfall, then find Gilzir, Captain Kaleen's boatswain, in the Southern Docks and travel to Stros M'Kai.
- (Optional) You can go below decks and talk to Tumma-Shah. She will tell you that the crew mutinied, but not much more.
- Find Captain Kaleen in Port Hunding. She tells you to find Neramo, Jakarn or Crafty Lerisa.
- Look for Neramo outside the ruins of Bthzark, Jakarn inside of the Grave or Crafty Lerisa near Saintsport.
Recommended Level: 4 | Reward: 85 Gold
Quest Giver: Neramo, Ellashana or Andrilion outside the ruins of Bthzark
- A researcher named Neramo is exploring the Dwemer ruins of Bthzark, looking for a way inside. He asks for your help.
- Collect the primary and secondary focusing crystals outside Bthzark, then find Neramo at the ruins entrance.
- Now Neramo starts to repair the automaton and the rod that controls it. Then he sends the automaton to open the entrance.
- Enter Bthzark with Neramo. Escort the automaton to the eastern and western generators so it can repair them.
- Speak with Neramo after it's done in the Central Chamber of the ruins. Enter the Assembly Chamber to find the Dwemer Schematics.
- Here you can go through the left door or right door, both lead to the same room, but you'll face different obstacles on the way there:
- The left door leads onto a bridge filled with Dwarven vents that will release Dwarven spiders,
- The right door leads to a bridge with steam traps, electrical traps and one Dwarven vent trap.
- Once you make it past all the traps go through the door, run over the next bridge and grab the schematics near the skeleton.
- Meet up with Neramo outside Bthzark and give the schematics to him. Now he promise to help Captain Kaleen with the heist.
Recommended Level: 4 | Rewards: 106 Gold, Neramo's Staff (Two Hand Healing Staff, Weakening Enchantment, Powered)
Quest Giver: Irien outside the Grave
- Jakarn was thrown into the Grave, a prison below Headman Bhosek's Palace, as Bhosek accused him of stealing a valuable gem.
- Speak to Irien outside the Grave and find Jakarn inside. Open the cell door and leave the Grave via the side exit in the far room.
- Once outside Jakarn asks for help with the goblins, as he has left something there. Meet up with Jakarn at the goblin mine.
- Enter the mine and go to the storage room on the upper level to grab a giant red gemstone guarded by the goblin leader Gornog.
- After exiting the mine, you'll see the headman's guard, Moglurkgul. She is looking for Jakarn. Choose what to say to her:
- [Lie] Sorry. Haven't seen him. (You keep the gem and recruit Jakarn)
- Wait, I did find this gem... (You give the gem back to Headman Bhosek)
- Proceed to the Screaming Mermaid Inn. Outside the inn you'll find Irien crying. Talk to her to find out that Jakarn cheated on her.
- Go inside the inn and talk to Jakarn. Give him the gem and he'll join Captain Kaleen's crew.
Recommended Level: 4 | Reward: 170 Gold, Jakarn's Machete (One Hand Sword, Hardening Enchantment, Sharpened)
Quest Giver: Telonil near Saintsport
- The Sea Drakes have captured friends of Telonil. They are being held at Saintsport.
- Follow the marker to find Crafty Lerisa's monkey, Howler, and Lerisa sneaks up from behind.
- Talk to Crafty Lerisa. She asks you to rescue her crew and then meet her by Captain Helane's ship.
- Grab the Sea Drake disguise. Release Haerdon, Mekag gro-Bug, and Crenard Dortene.
- Now find Lerisa behind some rocks near the docks. She tells you to go onto Captain Helane's ship and rescue her first mate Deregor.
- Proceed to the ship to the southeast. Get key to storeroom, then find Deregor and free him.
- Head up to the captain's cabin where Lerisa gave to Helane jarrin root, a very nasty local poison. Helane falls to the floor in pain.
- Talk to Lerisa and then either give Helane the antidote or just leave and let her die.
- Whatever is chosen, go to the beach after to meet up with Lerisa and her crew. She'll join Captain Kaleen's crew.
Recommended Level: 4 | Reward: 106 Gold, Smuggler's Vest (Medium Armor (Chest), Max Stamina Enchantment, Intricate)
This quest is an alternative to The Spearhead's Crew, and is given if you find Jakarn, Lerisa or Neramo before talking to Kaleen
- Talk to Captain Kaleen in Port Hunding.
Recommended Level: 4 | Reward: 85 Gold
Quest Giver: Nicolene somewhere on Stros M'Kai
- Captain Kaleen's cabin girl, Nicolene, informed you that Kaleen's crew is ready to start the heist as soon as you done recruiting.
- Recruit Neramo, Jakarn and Crafty Lerisa. Head to Port Hunding to find the hideout.
- Talk to Nicolene at the hideout.
Recommended Level: 4 | Reward: 85 Gold
Quest Giver: Lambur outside Kaleen's hideout in Port Hunding
- Speak with Captain Kaleen in the hideout when you ready to start the heist. She tells you to steal Bhosek's sailing logs.
- Headman Bhosek has violated King Fahara'jads orders to stop raiding Breton ships and these papers will prove this to the king.
- Obtain a Servant's disguise and then enter Headman Bhosek's Palace. Ask one of the servants about the whereabouts of Bhosek.
- Hint: Crafty Lerisa is a master of disguise, perhaps she can help get a Servant's disguise.
- Head out to the court yard to find Headman Bhosek and get the key to the lockbox.
- Hint: Jakarn is a master thief and perhaps he can help getting the key to the lockbox.
- Enter the palace again and go upstairs to find the lockbox guarded by Helthar. Disable Bhosek's guard.
- Hint: Neramo may be able to help getting the shipping logs from the lockbox.
- Open the lockbox and get the shipping logs. Head to the docks to find Kaleen and give her the shipping logs.
- Talk to Kaleen when you'll ready to sail for Betnikh.
Recommended Level: 5 | Reward: 186 Gold, Gallant Chain (Heavy Armor (Chest), Max Stamina Enchantment, Reinforced)
Side Quests:
The quest begins when you find the body of Siraj
- Find Siraj's body in the small cave just west of Sandy Grotto Wayshrine.
- Bring the bracelet and note to Terina, who can be found in Port Hunding sitting by a fountain, not far from Headman Bhosek's Palace.
Recommended Level: 2 | Reward: 14 Gold
Quest Giver: Grubby Grunyun north of Port Hunding
- Grubby Grunyun asks you to help free his friend Marq. The goblins stole Marq's special brew, and he has gone off to live with them.
- Find Marq's special brew on the ground in the goblin camp up a hill to the west.
- Marq is not far from the brew, dressed as a goblin and behaving like one. Speak to Goblin Marq and give the brew to him.
- After that Marq will come to his senses, change back to his normal clothes, and run off. Talk to Grubby Grunyun for your reward.
Recommended Level: 4 | Reward: 42 Gold
The quest begins when you find the buried chest near a shipwreck just southwest of Saintsport
- Open the buried chest to find a shovel and sealed letter. Read the letter and solve the clues to find Captain Izad's treasure.
- The first clue is the lighthouse just north of Saintsport ("Stand atop Saintsport's star"). Go inside and head up to the top.
- North of the lighthouse you can see the large stone statue overlooking Port Hunding ("And spy the eternal sentinel").
- When you reach the sentinel follow the left wall around until you find Port Hunding Wayshrine ("Skirt its gate to reach the shrine").
- Proceed to northwest of the shrine until you see a small statue of the warrior ("Northwest stands the warrior").
- Head directly south until you come to a rock ("Walk forty-five paces south, Leftward palms frame the sight").
- Turn to the southeast and find a small island in-between the lighthouse and the eternal sentinel ("Of the island of iron faces").
- Stand in the center of the island and look southwest - this pillar is the rocky finger ("Follow the rocky finger").
- Head to the southwest through another wreck until you find the rocks with wooden beams in a bay ("Through the broken ship").
- Swim through the bay to the north of this "stone ship" where you will find some disturbed soil ("Find the stone ship at anchor").
- Dig up the disturbed soil to reveal a chest. Open the chest and get your reward ("Riches lie under leaves in its port").
Recommended Level: 4 | Reward: 106 Gold, Izad's Treasure (Amulet, Magicka Recovery Enchantment, Ornate)
Quest Giver: Trelan northwest of Saintsport
- Trelan tells you that Sea Drakes, a group of pirates, attacked and kidnapped two people last night. He asks you to find them.
- Head over to the shipwreck west of Saintsport, to find Iriana and Shamal. They will be freed when you interact with them.
- Talk to Trelan for your reward.
Recommended Level: 4 | Reward: 21 Gold
Quest Giver: Dugroth northwest of Port Hunding Wayshrine
- Dugroth's mother has sent him out to kill a monster. But Dugroth thinks he can't do it, and he'd lost his father's old sword...
- Retrieve the sword for Dugroth. It can be found on the shore to the west, sticking out of the ground.
- Give the sword to Dugroth, then he will use bait to summon Deathfang.
- Dugroth's courage will desert him as soon as Deathfang emerges from the water, and he will flee.
- Kill Deathfang without Dugroth, then go and find Dugroth who is hiding on the beach nearby.
- Dugroth asks you for advice: he does want to be a warrior and make mother proud but he also love smithing. Choose one option.
Note: If you advise him to take up blacksmithing, he will be found in Port Hunding near Falbert's Forge after the quest is over.
Recommended Level: 4 | Reward: 85 Gold
The quest begins when you read Rulorn's note found on a corpse outside Port Hunding
- Find a corpse with a note and a gear. The note says Rulorn in Port Hunding has offered a bounty for Dwarven parts.
- Collect four Dwarven parts scattered around the island of Stros M'Kai.
- Return to Port Hunding and speak to Rulorn. Give him the parts, wait for his command and then pull the lever.
- After that the rusty sphere begins to move. Talk to Rulorn again and he'll give you your reward.
Recommended Level: 4 | Rewards: 85 Gold, Rulorn's Silken Garb (Light Armor (Chest), Max Health Enchantment, Well Fitted)
Quest Giver: Gugnir southeast of the Dogeater Goblin Camp
- King Demog killed Gugnir's brothers and left him for dead. Gugnir asks you to avenge his brothers by killing the goblin king.
- King Demog can be found in the northwestern part of Dogeater Goblin Camp. Kill the goblin king and retrieve his crown.
- Go to Port Hunding to meet up with Gugnir. Give him the crown and tell him the king is dead.
Recommended Level: 4 | Reward: 42 Gold, Goblinslayer Chausses (Heavy Armor (Legs), Max Stamina Enchantment, Training)
Quest Giver: Shazeem northeast of Port Hunding
- Shazeem tells you that he woke up on the shore and he can't remember how and why he is stranded on this beach.
- Talk to the monkey, Qawi, and then follow him to buried items. Pick up all four items and bring them to Shazeem.
- Speak with Shazeem. Now he remembers everything and gives you your reward.
Recommended Level: 4 | Reward: 85 Gold
Stros M'Kai Skyshards:
- Across the water from the western wall (Behind Neramo's tent with dwemer artifacts).
- The mouth of The Grave stands open (Next to the entrance into The Grave mini dungeon).
- Crashed through a Saintsport roof (Inside one of Saintsport's houses with a broken roof).
Stros M'Kai
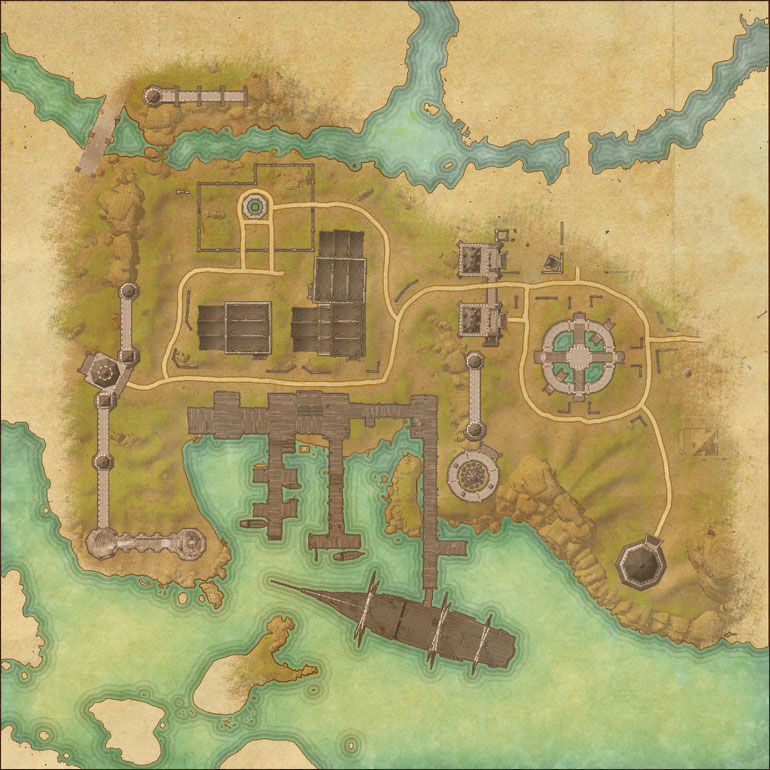
 Port Hunding
 The Grave
 Bthzark
 Saintsport
 Headman Bhosek's Palace
 Lighthouse
 Dogeater Goblin Camp
- Rash Merchant's Plummet
- Pillar of the Singing Sun
 Saintsport Wayshrine
- Port Hunding Wayshrine
- Sandy Grotto Wayshrine
 Stros M'Kai Treasure Map I
- Stros M'Kai Treasure Map II
- Stros M'Kai Treasure Map CE
 Skyshard (Across the water from the western wall)
- Skyshard (The mouth of The Grave stands open)
- Skyshard (Crashed through a Saintsport roof)